


The drive optimization in Windows 11 is the key to obtaining the highest performance as these are the drives that lend you most of the speed that you need while saving and transferring files. The drive speed also matters when you operate the system and access various applications. Therefore, this becomes essential to keep your drives optimized to extract the maximum performance out of your PC. We all know that it is very difficult to do continuous optimization. Here comes handy the CL Debloat.
This is an amazing tool that allows you to optimize your operating system easily without putting in too much effort. The software downloading file is lightweight, and the user interface is very simple. But the optimization features are very powerful. This tool will remove all the bloatware, unwanted built-in Windows 11 ads, and unnecessary heavy graphical consumption.
Step 1: Download and Install CL Debloat
Before optimizing your Windows 11 drive, you need to download and install CL Debloat.
- Visit the official CL Debloat website to download the latest version.
- Locate the files in the Download folder.
- Right-click on the file and select Run as administrator to launch the application with the necessary privileges.
- If Windows Defender prompts a warning, click More info > Run anyway to proceed.
Once CL Debloat opens, you’ll see a simple interface divided into three main tabs: Visual, Bloat, and Ads.
Step 2: Remove Bloatware for Drive Optimization
Unnecessary applications and background processes consume system resources and storage space. Removing them helps free up SSD space and improves performance.
Access the Bloat Tab
- Click on the Bloat tab in CL Debloat’s interface.
- Here, you’ll see multiple options to disable or remove pre-installed Windows features and applications.
- Select and remove bloatware.
- Click Select All if you want to disable all unnecessary features or manually choose specific ones from the following list:
- Disable Windows Recall: Prevents Windows from saving unnecessary activity data.
- Disable Chat in Taskbar: Removes Microsoft Teams integration if unused.
- Disable Copilot: Removes the AI-based Windows assistant.
- Disable Game Bar: Frees up memory if you don’t use Xbox Game Bar.
- Disable Widgets in Start Menu: Reduces background memory usage.
- Disable ‘Recommended’ in the Start Menu: Removes suggested apps and content.
- Hide the ‘OneDrive’ folder: This prevents automatic syncing if it is not used.
- Hide ‘Gallery’ Folder: Removes Windows’ built-in media aggregation feature.
- After selecting the desired options, click Apply to remove these items immediately.
- Restart your PC so the changes take full effect.
Step 3: Disable Ads and Unnecessary Telemetry
Windows 11 includes various ad placements and telemetry tracking services like BitLocker that not only invade privacy but also consume system resources. Disabling these can improve system efficiency and speed up your SSD’s read/write operations.
Navigate to the Ads Tab
- Click on the Ads tab in CL Debloat.
- You’ll find a list of ad-related features and telemetry tracking that can be disabled.
- Disable Ads and Tracking
- Click Select All for a comprehensive cleanup or manually select from the following options:
- Disable Telemetry Tracking: Stops Windows from collecting background user data.
- Disable Personalized Ads: This prevents ad tracking across Microsoft services.
- Disable Suggested Content in the Settings App: Removes promotional content from Windows settings.
- Disable Ads in File Explorer: Stops Microsoft promotions in File Explorer.
- Disable Bing Results in Search: Prevents Bing from slowing down search operations.
- Disable Lock Screen Ads: Removes promotional content from the lock screen.
- Disable Finish Setting Up Windows: Prevents Windows from nagging about additional setup steps.
- Click Apply to remove the selected ad and telemetry settings.
- Restart your system to implement the changes.
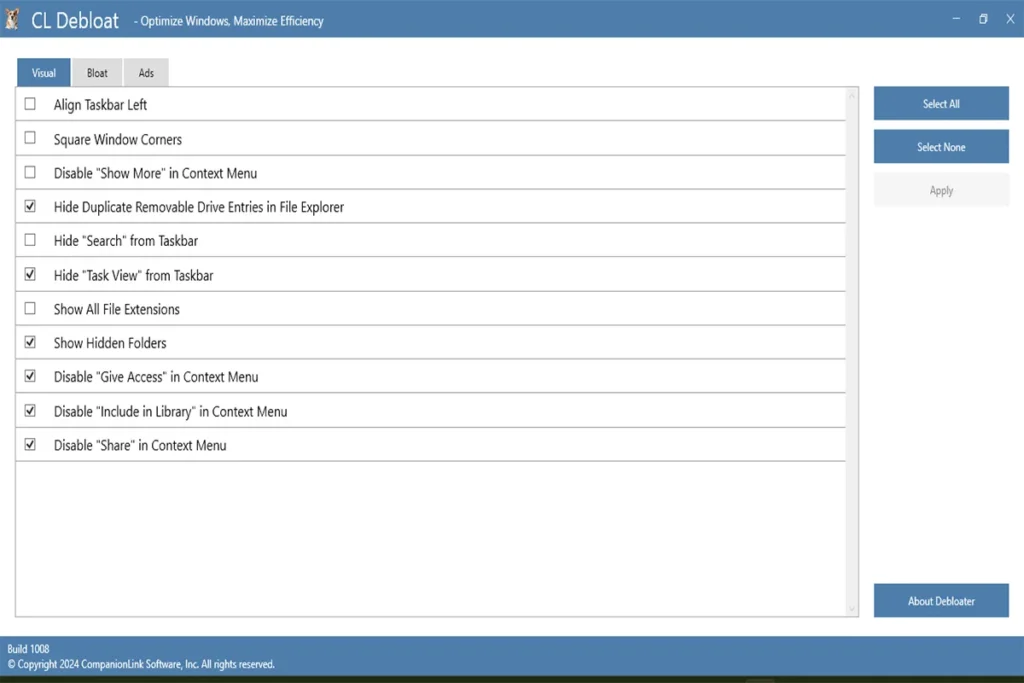
Step 4: Optimize Visual Effects for Better SSD Performance
Windows 11’s visual enhancements, like animations and transparency effects, can slow down system performance and increase SSD wear over time. Disabling them helps optimize CPU performance, especially on older machines.
Adjust Visual Settings
- Click on the Visual tab in CL Debloat.
- Here, you’ll find options to reduce unnecessary UI effects.
- Disable Transparency Effects: Removes semi-transparent UI elements to improve responsiveness.
- Disable Animations: Reduces lag by disabling unnecessary motion effects.
- Disable Acrylic Blur: Removes background blurring to reduce GPU load.
- Disable Shadows and Fade Effects: Makes Windows UI snappier.
- Click Apply to confirm changes.
- Restart your PC for the best effect.

Step 5: Defragment and Optimize Drives
While SSDs don’t need defragmentation like HDDs, optimizing the drive can improve its longevity and maintain high read/write speeds.
Use Windows’ Built-in Optimization Tool
- Press Win + S and search for Defragment and Optimize Drives.
- Open the tool and select your SSD.
- Click Optimize to run the built-in TRIM command, which helps manage SSD performance.
This process ensures that your SSD maintains optimal efficiency by properly managing unused storage blocks.
Step 6: Disable Unnecessary Startup Programs
Too many startup programs slow down boot times and consume SSD space. Disabling them improves drive performance.
Disable Startup Apps
- Press Ctrl + Shift + Esc to open Task Manager.
- Click on the Startup Apps tab.
- Identify programs with High impact and disable unnecessary ones by right-clicking and selecting Disable.
- OneDrive (if not used).
- Skype.
- Microsoft Teams.
- Background update services for third-party software.
- Restart your system so these changes take effect.
Step 7: Update Windows and Drivers
Keeping your system updated ensures better SSD optimization and reduces unnecessary background processes.
Update Windows
- Press Win + I to open Settings.
- Navigate to Windows Update.
- Click Check for updates and install any available updates.
Update SSD Drivers
- Press Win + X and select Device Manager.
- Expand Disk drives.
- Right-click on your SSD and select Update driver.
- Choose Search automatically for drivers and install updates if available.
Conclusion
Using CL Debloat to optimize drives in Windows 11 is an effective way to remove unnecessary bloatware, disable intrusive ads, and fine-tune visual settings. By following these steps, you can significantly improve system performance, reduce SSD wear, and create a smoother, faster Windows experience. Regularly updating drivers and optimizing startup programs further ensures long-term system efficiency.
Additionally, a well-optimized system translates into faster boot times, improved responsiveness, and better hardware longevity. Ensuring that unnecessary applications and background processes are disabled means that your SSD won’t wear out as quickly due to excessive read/write cycles. Small changes like adjusting visual settings and clearing bloatware make a huge difference over time, keeping your Windows 11 experience fluid and efficient. Give your Windows 11 system a fresh boost today with CL Debloat!